- Per trasferire EasyForYou su un nuovo computer
- Per modificare i quantitativi di prodotti nel vostro inventario
- Effettua un backup - Ripristino del backup
- È possibile correggere o cancellare un documento che sia già stato chiuso?
- Come cominciare una fattura con un numero qualunque X? Possiedo delle fatture già emesse e vorrei continuare con un numero di fattura successivo alla mia ultima fattura manuale. (Moduli necessari: EFYDATA)
- Quali tra le funzionalità attualmente disponibili, spariranno tra più o meno un mese (in base alla frequenza d'uso)?
- Come si possono calcolare le commissioni di un agente di commercio sulla vendita dei prodotti?
- Generi il vostro setup CD-ROM
- Come installare il programma in rete?
- Utilizzo del modulo per la stampa delle schede trasportatori
- Stampa sui documenti le foto che illustrano i prodotti
- Tariffe in ordine decrescente
- Gestione dei prodotti per numero di serie
- Registrazione di prestazioni orarie
- Esporta e importa la banca dati prodotti
- Numerazione dei documenti con l'entrata nel nuovo anno.
- Gestione Back-Order (Giacenza merce)
- Procedura per la modifica del file layoutmod.htm
- Configurazione ed utilizzo del lettore codici a barre
- Accorgimenti importanti di cui tener conto per aggiornare correttamente il programma in esecuzione (su una rete)
- Procedura di disinstallazione completa di Easy For You
- Setup E-Commerce
- Generatore di lettere di sollecito
- Password per accedere alla banca dati (easywin.mdb)
- Istruzioni per l'invio del file easywin.mdb
- Istruzioni per ricevere il file easywin.mdb
- Parametraggi possibili dai file con estensione INI
- Importazione-exportazione da Excel
- Gestione delle Ecotasse
- Importazione da Documenti dell'altro software (E-Commerce)
- Windows 8, 7 Vista
- Gestione delle attribuzioni delle rimanenze (saldi) fornitori
- Stampa etichette
- Printing error -> res://ieframe.dll/preview.js
- Send documents From a Head Office to a Remote Store
- Generare PDF
- Campo additionnàle variables
- Verificare la validità di una codice fiscale sul Web
- Use EFY on multiple PCs via the Internet (for single-user version).
- Gestione degli arrotondamenti per gli importi di stampa, compresa l'IVA
- Remote access via Internet
- Gestione dell'inventario mobile e software di fatturazione per Android
- Setup Smtp
- PEPPOL
-
1)Per trasferire EasyForYou su un nuovo computer (Inizio)
1) Scaricare ed installare la versione dimostrativa di Easyforyou sul nuovo computer poi registrate e stampate una fattura di prova (eventualmente cliccate sul pulsante CD-Key per ricevere un numero di attivazione ).
2) Riavviare il computer, ma NON riavviare la versione dimostrativa di EasyForYou.
3) Cancellate gli archivi temporanei del vostro navigatore. (molto importante)
4) Copiare tutte i file della cartella EsayFouYou (normalmente in c:\Users\USERNAME\AppData\Roaming\EasyNet\Easy For You (Per individuare la cartella, vedi menu Aiuto->Cartella)) del vecchio computer ed incollare sul nuovo computer nella cartelle (normalmente in c:\Users\USERNAME\AppData\Roaming\EasyNet\Easy For You (Per individuare la cartella, vedi menu Aiuto->Cartella)) sostituendo i file esistenti
!!! non installare mai EasyForYou nella cartella "C:\Program Files (x86)" o in "C:\Program Files"
(Queste cartelle sono troppo restrittive e alcune funzionalità di EasyForYou sono bloccate)
!!! -> Windows 10,8,7, Vista, XP
- 2) Per modificare i quantitativi di prodotti nel vostro inventario (Inizio)
(Moduli necessari: EFYSTOCK)
Per modificare i quantitativi di prodotti nel vostro inventario, Registrare una fattura di acquisto:
1) Cliccare su "Acquisto" nella barra degli strumenti.
2) Selezionare "Acquisto" o "Inventario".
3) In alto a sinistra, inserire "REG" come Codice fornitore (REG = Codice fornitore per l'inventario).
4) Cliccare su "+" nella barra degli strumenti per aggiungere un documento.
5) Si seleziona il prodotto con il pulsante di ricerca e regolare la quantità in stock (Utilizzare quantità negative per ridurre lo stock). .
6) Se il prodotto non esiste, inserire il nuovo Codice desiderato nel corpo del documento, premere Invio (Enter) sulla tastiera, completare la nuova scheda prodotto e ritornare al documento per indicare la quantità da inserire in magazzino.
NB: Le uscite dal magazzino vengono registrate automaticamente con le fatture di vendita, scontrino.
- 3) Effettua un backup (Inizio)
(Backup (copia di sicurezza) su Dropbox,OneDrive o Google drive -> FAQ 39)
Preferibilmente non utilizzare la cartella C:\Temp per i backup (vedere il menu File->Utenti).
Tutti i dati registrati sono contenuti in c:\Users\USERNAME\AppData\Roaming\EasyNet\Easy For You (Per individuare la cartella, vedi menu Aiuto->Cartella)\easywin.mdb
Effettua un backup
EasyForYou effettua automaticamente un backup giornaliero al primo avvio del software nella cartella specificata in File->Utenti->Cartella di destinazione per il backup.
Come impostazione predefinita il programma crea un backup nella cartella C:\Temp. Si consiglia tuttavia di scegliere come cartella di destinazione una cartella condivisa su un altro computer.
Il ciclo di backup è di una settimana in formato easywin_X.mdb, dove X sta per il giorno della settimana (1=Sabato). Anche per ogni aggiornamento del software è previsto un backup che verrà creato In un file simile a: easywin_5update121719.mdb per i dati e in un file simile a: easywin030881142100.exe per il software.
Raccomandiamo per motivi di sicurezza il salvataggio periodico su CD-Rom della cartella ''Easy For You'' contenente l'intero software
Per fare un backup gratuito su un server remoto, è possibile utilizzare https://drive.google.com (5 Gb di spazio libero), poi in EasyForYou nel menu File->Utenti->Cartella di destinazione per il backup, vi darà il percorso del googledrive locale (ad esempio C:\googleDrive \EasyForYou)
Questo è il miglior modo per fare una copia di backup.
Ripristino del backup
Per ripristinare un backup, rinominare il file (di norma in c:\Users\USERNAME\AppData\Roaming\EasyNet\Easy For You (Per individuare la cartella, vedi menu Aiuto->Cartella)) easywin.mbd col nome easywinOLD.mbd
Poi riprendere il backup più recente in C:\Temp\easywin_X.mdb (X= numero da 1 a 7 corrispondente al giorno della settimana) e copiarlo nella cartella dei programmi (di solito c:\Users\USERNAME\AppData\Roaming\EasyNet\Easy For You (Per individuare la cartella, vedi menu Aiuto->Cartella)) e rinominarlo easywin.mdb
Se il backup ripristinato non ha la stessa versione del vostro software attuale, scaricate l'aggiornamento dal nostro sito.
Se avete dubbi o domande, prendete un contratto di manutenzione (vedere il modulo EFYHELPDESK) e contattate il nostro servizio assistenza on-line. EFYHELPDESK
!!! -> Windows 8, 7, Vista
- 4)È possibile correggere o cancellare un documento che sia già stato chiuso? (Inizio)
(Moduli necessari: EFYSTOCK,EFYPAIMENT)
Nel caso di un errore in un documento, ad esempio se si vuole sbloccare un documento già chiuso, avete tre possibilità: (i punti 2 e 3 non sono disponibili nella versione di prova né in quella gratuita)
In Gestione documenti selezionare il documento in questione cliccando sul numero di Codice e poi:
1) Cliccare su Modifica->Riapri Documento (Attenzione: in seguito a tale operazione, se la fattura viene cancellata allora i prodotti ad essa legata saranno rimessi in magazzino)
2) Cliccare su Strumenti->Archivia doc., archiviate il docum. in questione. Se desiderate riutilizzare il num. di questo doc. archiviate un docum. alla volta e cliccate su SÌ alla domanda Recuperare automaticamente il numero di documento? Attenzione: in seguito a tale operazione, il documento verrà cancellato e i prodotti non verranno rimessi in magazzino) (Vedere tariffe->modulo: EFYARC). NB: Questa operazione è irreversibile.
3) Apportate modifiche e correzioni direttamente nel database EasyWin.mdb utilizzando l'applicazione Access (Vedere tariffe->modulo: EFYMDBACCESS)
- 5)Come cominciare una fattura con un numero qualunque X? Possiedo delle fatture già emesse e vorrei continuare con un numero di fattura successivo alla mia ultima fattura manuale. (Moduli necessari: EFYDATA) (Inizio)
(Moduli necessari: EFYDATA)
Per generare il primo documento del nuovo anno in corso Easy For You si basa sulla data interna del vostro PC.
Per esempio, al 31 dicembre 2014 la vostra ultima fattura è la FT120140003453. Il primo gennaio del 2015 Easy For You creerà la fattura FT120150000001.
(Modulo necessario: EFYDATA)
Dopo aver creato la prima fattura, se il numero non è corretto, o se lo si vuole modificare, è possibile farlo nel menù File->Impostazioni documenti->Inizio numerazione (non dimenticate di selezionare il documento corretto!)
Nel corso del nuovo anno, se desiderate creare delle fatture per l'anno precedente, potrete farlo inserendo dei documenti andando su: Menù Strumenti->Inserisci documento.
- 6)Quali tra le funzionalità attualmente disponibili, spariranno tra più o meno un mese (in base alla frequenza d'uso)? (Inizio)
Tutte le opzioni che figurano nel menù Tariffe del nostro sito.
Rimarranno gratuitamente funzionanti dopo 30 giorni:
- La Gestione Clienti e Fornitori
- La possibilità di generare e stampare fatture, note di credito, ordini, etc..;
- La visualizzazione dei totali, calcoli, margini di profitto, pesi, etc...
- 7)Come si possono calcolare le commissioni di un agente di commercio sulla vendita dei prodotti?
(Inizio)
(Moduli necessari: EFYLIST)
Dalle liste è possibile estrarre i documenti o i movimenti particolari di un agente di commercio:
Procedere in questo modo:
- Nelle schede clienti, sulla parte destra, potrete introdurre un ''Codice Agente di Commercio'', ad esempio una lettera: D
- Successivamente nel menù di selezione che precede le stampe delle liste, utilizzate lo stesso codice (D) nel campo ''Codice Agente di Commercio'' e otterrete una lista delle fatture o movimenti relativi all'agente di commercio D.
- 8)Generi il vostro setup CD-ROM (Inizio)
Download easyforyou.exe e copiate su un CD-ROM
- 9)Come installare il programma in rete? (Inizio)
(Moduli necessari: EFYNET2, 5...)
L'installazione del software in rete può essere eseguita tramite il metodo classico di condivisione semplice di una cartella per più utenti (anche possibile su un NAS)
In questo caso, vedi qui sotto, punto 1)
MA! Se hai Windows 10 (o versioni successive) e alcune competenze informatiche, ti consigliamo vivamente di utilizzare il metodo desktop remoto multi-sessione (senza interrompere le sessioni esistenti).
È con questo sistema che otterrai le migliori prestazioni per lavorare contemporaneamente con più persone da più posizioni in EasyforYou.
E questo è anche il modo in cui avrai il miglior livello di sicurezza perché non avrai dati che passano su Internet e il tuo database rimane sul tuo computer principale.
Crea un BACKUP e guarda il video e la patch di seguito per impostare Windows in modalità multisessione (questa procedura non è nostra responsabilità).
Dopo l'installazione del video multisessione di Windows ...
Come installare EasyForYou per gli altri utenti
(Supponendo che il software sia già installato nella sessione principale, ad esempio con l'utente "ADMIN" sul computer desktop)
a) Nella sessione Windows del tuo computer principale (quella del tuo ufficio), connesso con l'utente principale "ADMIN", aggiungi un nuovo (o più) utente con password (ad esempio "Shop1, Shop2, ecc ...")
b) Concedere le autorizzazioni di lettura e scrittura per i nuovi utenti "Shop1, 2, 3 ... ecc.) nella cartella principale (EasyNet) in cui si trova EasyWin.exe.
(Di solito EasyForYou si trova in questa cartella predefinita: C:\Users\ADMIN\AppData\Roaming\EasyNet\Easy For You) (vedere il percorso esatto nelle proprietà delle scorciatoie di EasyForYou)
c) Su un altro PC, connettiti all'ufficio principale (desktop) in remoto come utente "Shop1", quindi scarica e installa una versione demo di EasyForYou nella sessione "Shop1".
d) Sempre, sull'altro PC, dopo l'installazione della demo, è sufficiente modificare il collegamento sul desktop:
Modifica il percorso del collegamento:
C:\Users\Shop1\AppData\Roaming\EasyNet\Easy For You
E sostituisci con:
C:\Users\ADMIN\AppData\Roaming\EasyNet\Easy For You
(ADMIN o il nome utente principale del computer desktop)
e) Non appena EasyForYou funziona e sei sicuro di vedere fatture, ordini di vendita e dati del pc della tua sede principale, per sicurezza, elimina l'intera cartella: C:\Users\Shop1\AppData\Roaming\EasyNet\Easy For You
f) Ripeti tutte le volte necessarie per Shop2, Shop3 ecc ...
Windows Multi-sessions procedure : Video Youtube)
Windows Multi-sessions Patch : Patch)
1) On the Server:
-Install the software Easy For You
-Share the folder C:\program files\EasyNET or " c:\Users\USERNAME\AppData\Roaming\EasyNet\Easy For You (Per individuare la cartella, vedi menu Aiuto->Cartella) " on the level EasyNet, authorise the Reading AND writing for the folder.
Attention, different procedure for the users from the E-commerce!
Sharing the folder at level /Eshop/Users for reading and writing for the users of the other PC.
2) Sui client:
- Installare completamente 'Easy For You', avviarlo ed inserire i dati società.
- In seguito cancellare la da folder "c:\Users\USERNAME\AppData\Roaming\EasyNet\Easy For You (Per individuare la cartella, vedi menu Aiuto->Cartella)"
- Per avviare 'Easy For You' dal client, ritrovare nella rete il programma EasyWin.exe situato sul server e creare un link sul desktop.
- Per ciascun client, dal menù File ->Socetà, installare il vostro logo.
- Aggiungere (se non viene fatto automaticamente ) l'utente client in File->Utenti. - Per un'installazione ottimale, sincronizzate gli orologi dei diversi PC della rete. NB1: La versione DEMO consente di testare il programma in una rete con un massimo di due utenti. NB2: Per un utilizzo ottimale in rete, vedere i parametri nel menù File->Utenti->Gestione
NB3: Importante! Per ottimizzare la velocità di rete, le impostazioni di rete della scheda di rete deve essere impostato su FULL DUPLEX
Nota 4: è preferibile assegnare i diritti di amministratore al file EXE.
The good Shortcut :
The shortcut on the desktop from the workstation to easywin.exe on the server with a mapping to a permanently network drive (sharing on the level EasyNet) must be like this :
Z:\Easy For You\easywin.exe
NOT like this
\\.....\EasyNet\Easy For You/easwin.exe
For Dell computers to improve the performance of your software into a network:
Go to Dell computers download page
- 10)Utilizzo del modulo per la stampa delle schede trasportatori (Inizio)
(Moduli necessari: EFYEXPRESS)
1) Verificate se siete in possesso della licenza d'uso EFYEXPRESS - > EFY->File->Licencze
2) Aggiungere un trasportatore in gestione clienti, impostare il Tipo su "Corriere Espresso" (ad esempio DHL)
3) Copiare i file layoutEFYEXPRESS.htm e layoutEFYEXPRESSsmall.htm nella cartella che contiene easywin.exe
4) Rinominare i file layoutEFYEXPRESS.htm e layoutEFYEXPRESSsmall.htm in layoutRéfClient.htm e layoutRéfClientsmall.htm Per esempio layoutDHL.htm e layoutDHLsmall.htm
5) Inserire i nomi delle stampanti in EFY->Strumenti->Parametri->Generali :
Stampante 1*: Destinata ai documenti generali EFY
Stampante 2*: Destinata alle grandi schede trasportatore
Stampante 3*: Destinata alle piccole schede trasportatore
*Utilizzare il nome esatto così com'è riportato in Windows->Avvio->Parametri->Stampanti
6) Per stampare le schede, cliccare col pulsante destro del mouse sull'icona stampante nella gestione documenti e successivamente selezionare il trasportatore. Easy For You propone come impostazione predefinita la stampa di un numero di schede di trasporto pari al numero dei prodotti nel documento attivo.
7) Adattare il lay-out modificando il codice HTML con l'aiuto di un editor quale Front-Page o Dreamweaver nei file layoutsRéfClient.htm in base alle marche delle stampanti o rivolgendovi al supporto tecnico della nostra società.
8) All'occorrenza inserire i valori e i testi fissi in layoutsRéfClient.htm, sempre con un editor HTML
- 11)Stampa sui documenti le foto che illustrano i prodotti (Inizio)
(Moduli necessari: EFYIMGDOC,EFYDATA)
1) Verificate che siate in possesso della licenza d'uso di EFYIMGDOC - > EFY->File->Licenze
2) Verificate che siate in possesso della licenza d'uso di EFYDATA - > EFY->File->Licenze
3) Per legare un'immagine ad uno dei vostri documenti copiare il file immagine nella cartella c:\program files\Easy for You\Images e inominarlo Código _PRODOTTO.JPG (o GIF)
4) Spuntare la casella "Stampa immagine sui documenti" nella File->Prodotti alla sezione Immagine.
5) Spunatare la casella "Stampa immagine sui documenti" nella menu File->Impostazioni documenti.
6) Adattare eventualmente la misura delle immagini nel menù
Strumenti->Parametri->Prodotti->Riduzione per la stampa delle immagini.
Warning: Send emails including photos only works with: Email PDF
See alson FAQ 41
- 12)Tariffe in ordine decrescente
(Inizio)
(Moduli necessari: EFYCATEGORY,EFYPRICEPQ)
* Impostazione dei Parametri della Tariffa decrescente per quantità:
Nella gestione delle categorie, creare una Categoria.
Nella gestione dei prodotti, alla sezione WEB (in basso a destra) selezionare la vostra categoria.
Nella sezione WEB, spuntare la casella "Tariffa decrescente". (Nella zona d'inserimento dei prezzi della scheda prodotti).
Inserire i 5 prezzi di vendita decrescenti partendo dal prezzo 1 come prezzo più alto.
Completare i 4 campi "Per quantità", (a destra nella zona d'inserimento dei prezzi).
Come valore, indicare una QUANTITÀ di prodotti a cominciare dai quali il prezzo dovrà diminuire dal prezzo 1 al prezzo 2 e così di seguito.
* Impostazione dei Parametri della Tariffa decrescente per quantità in base alla CATEGORIA! (Attenzione: prioritario sulla tariffa per quantità):
Nella gestione delle categorie, creare una Categoria, scegeliere il tipo "Prezzo", aggiungere un prezzo per una quantità di prodotti da... a....
Aggiungere anche delle ''forchette" di prezzo, o margini (selezionare il "Tipo" prezzo o margine di guadagno in rapporto al prezzo 1) per le quantità da... a... che desiderate.
Nella gestione dei prodotti, alla sezione WEB (in basso a destra) selezionare la vostra categoria.
NB: Il tipo "Categoria Margine" o "Categoria Sconto" consente di calcolare un margine di guadagno o sconto sul prezzo 1 di un prodotto in base ad una categoria di cliente.
Esempio:
Nella gestione clienti, per il cliente ACBTEST nella categoria (in basso a destra) inserire un codice categoria a vostra scelta, per esempio X.
Nella gestione delle categorie creare una nuova categoria, ad esempio AUTOMOBILE e selezionare il tipo ''Categoria Sconto'', completare la descrizione e salvare. Cliccare sull'icona + per aggiungere una categoria di clienti per questa categoria di prodotti "Automobile".
Nella categoria inserite X (la vostra categoria cliente) e 30 nello sconto.
Nella gestione dei prodotti, creare un nuovo prodotto ad esempio "CHEVROLET" e nella scheda WEB, completare la sua categoria per "AUTOMOBILE" Di conseguenza, nella gestione di documenti, quando fate un'offerta o emettete una fattura per il prodotto "CHEVROLET" intestata al Sig. ACBTEST, questi appartiene alla categoria dei clienti X che hanno diritto ad uno sconto del 30%, e dunque il prezzo doi vendita calcolato è il prezzo 1 della scheda prodotti, meno il 30% di sconto.
- 13)Gestione dei prodotti per numero di serie (Inizio)
(Moduli necessari: EFYSERIAL,EFYADVSEARCH)
Registrazione numeri di serie:
I numeri di serie possono essere registrati nelle vendite e/o negli acquisti.
Per registrare un numero di serie legato ad un prodotto, nella gestione dei documenti (acquisti e/o vendite), cliccare sulla tabella del corpo del documento per passare in modalità modifica e puntare il cursore sul Código dei prodotti e cliccare sul pulsante DESTRO.
Nel menù popup selezionare ''Num. di serie'' per far apparire la finestra di registrazione dei numeri di serie.
Tali numeri possono venire registrati anche con l'aiuto di un lettore codici a barre con interfaccia tastiera per (occorre impostare i parametri CR-LF per l'inserimento automatico) o manualmente.
Con una registrazione manuale, il secondo campo consente di registrare una ''serie'' di numeri di serie in sequenza.
La ricerca di un documento (vendita o acquisto) per numero di serie:
Per effettuare una ricerca per numero di serie, inserire manualmente (o con un lettore codice a barre) il numero di serie da cercare nella gestione documenti nel campo di ricerca ''clienti fornitori'' in alto a sinistra SENZA premere Invio (Enter) né TAB e poi cliccare col pulsante DESTRO sull'icona per la ricerca (binocolo); si attiverà un menù popup, quindi selezionare ''Num. di serie''.
Se un documento con tale numero di serie esiste, verrà automaticamente richiamato ed un messaggio popup indicherà il Código del prodotto relativo al numero di serie.
Registrazione automatica attraverso i numeri di serie (UNICAMENTE PER LE VENDITE):
Nella tabella dei documenti, cliccare due volte sul numero del documento esistente per il quale volete aggiungere dei prodotti direttamente utilizzando i loro numeri di serie (perché ciò funzioni il numero di serie deve essere stato registrato previamente in uno dei documenti ''ACQUISTI''). Nel campo ''Num. Di serie'' (situato nella barra degli strumenti, secondo campo a destra del pulsante ''invia per e-mail''), inserire un numero di serie, se tale numero esiste negli acquisti, il Código del prodotto verrà rtirovato e verrà automaticamente aggiunta una riga alla fine del documento attivo (il numero di serie viene quindi registrato per questa vendita e può essere successivamente ritrovato con una ricerca (vedi sopra)
IMPORTANTE :Quando un documento viene copiato verso un altro, i numeri di serie passano automaticamente sul nuovo documento.
For coding serial numbers, you can choose which field the cursor should stop.
Add a line with the variable in ALL.INI file:
SerialEnterIndex = 0
Possible values:
0 = After ENTER, move the cursor to the input of the next serial number.
1 = The cursor moves to the next serial number after press ENTER after the "Number" field.
2 = The cursor moves to the next serial number after press ENTER after the "Packed" field.
3 = The cursor moves to the next serial number after press ENTER after the "Expiration" field.
- 14)Registrazione di prestazioni orarie (Inizio)
(Moduli necessari: EFYDATA)
Per la registrazioni di prestazioni orarie:
In gestione Prodotti, creare un prodotto destinato alla fatturazioine di prestazioni orarie:
Esempio:
Código : PRES
Descrizione: Prestazione
Per la registrazione delle Descrizioni nel corpo di un documento, utilizzare la seguente sintassi:
PRES Prestazione 14h45->18h30 + eventuale descrizione.
È categorico rispettare il formato ora come segue: 14h45->18h30, ovvero sempre due cifre seguite da ''h'' poi altre due cifre seguite dal segno ''-'' e ''>'' e ancora altre due cifre seguite da ''h'' e due cifre finali: XXhXX->XXhXX
In questo caso, confermando la descrizione, il programma calcola automaticamente il tempo intercorso tra i valori 'ore' inseriti per calcolare la prestazione oraria:
Esempio: 14h45->18h30 = 3 ore e 45 minuti, calcolate automaticamente come 3, 75 unità
- 15)Esporta e importa la banca dati prodotti (Inizio)
(Moduli necessari: EFYPRODIMPEXP)
Esportazione della banca dati dei prodotti:
In Easy For You, in Menù Strumenti->Esporta dati prodotti.
Easy For You genera un file in formato MsAccess C:\Temp\ArtEFY.mdb che contiene l'insieme dei prodotti registrati in Easy For You.
Importazione dei dati dei prodotti:
Dopo aver esportato C:\Temp\ArtEFY.mdb, prendere questa banca dati come modello.
Vi sarà eventualmente possibile modificare i prezzi degli articoli presenti in EFY.mdb, e verranno aggiornati in Easy For You dopo il ripristino.
Per inserire dei nuovi prodotti in Easy For You, rispettare la struttura di ArtEFY.mdb ed aggiungere i nuovi prodotti; fare successivamente una copia di ArtEFY.mdb in c:\program files\easy for you rinominando il nuovo file da importare ART.MDB.
Al riavvio di Easy For You i nuovi prodotti verranno importati e i prezzi dei prodotti esistenti verranno aggiornati.
Attenzione: in seguito a tale operazione il file ART.MDB verrà automaticamente distrutto.
Rispettare attentamente tutte le indicazioni e raccomandazioni per l'inserimento di nuovi prodotti:
Nel campo CLEF, inserire solo cifre o lettere maiuscole e senza spazi.
L'unico segno accettato in a CLEF et CLE2 è il segno ''-''.
Nei campi di testo non utilizzare l'apostrofo.
Per le quantità, non adattare direttamente il campo QUAN ma passare dalla registrazione degli acquisti -> Inventario.
- 16)Numerazione dei documenti con l'entrata nel nuovo anno. (Inizio)
Per generare il primo documento del nuovo anno in corso Easy For You si basa sulla data interna del vostro PC.
Per esempio, al 31 dicembre 2014 la vostra ultima fattura è la FT120140003453. Il primo gennaio del 2015 Easy For You creerà la fattura FT120150000001.
(Modulo necessario: EFYDATA)
Dopo aver creato la prima fattura, se il numero non è corretto, o se lo si vuole modificare, è possibile farlo nel menù File->Impostazioni documenti->Inizio numerazione (non dimenticate di selezionare il documento corretto!)
Nel corso del nuovo anno, se desiderate creare delle fatture per l'anno precedente, potrete farlo inserendo dei documenti andando su: Menù Strumenti->Inserisci documento.
- 17)Gestione Back-Order (Giacenza merce) (Inizio)
(Moduli necessari: EFYBACKORDER)
La linguetta Back-Order visualizza tutti gli ordini APERTI di tutti i clienti (o fornitori per gli acquisti).
(BO=Ordini la cui totalità non è stata ancora consegnata).
EFFETTUARE UNA CONSEGNA PARZIALE:
- Nella linguetta Back-Order, selezionare il cliente in questione con un doppio clic sulla riga corrispondente del documento.
- Per ciascun prodotto, indicare la quantità da consegnare nella colonna "consegnato" (la sola colonna modificabile) e premere F10 sulla tastiera per confermare l'insieme delle operazioni.
- Per creare la fattura corrispondente a tali prodotti, ritirarli dal magazzino cliccando su Rif., poi cliccare col tasto destro del mouse e selezionare: copia verso fattura o nota di spedizione.
- Solamente le righe corrispondenti ad una consegna completa spariranno dalla tabella.
- L'ordine corrispondente viene automaticamente chiuso con la consegna dell'insieme dei prodotti.
- Tutte queste operazioni sono disponibili per i Back-Order degli acquisti (fornitori).
- La stampa o l'anteprima consente di visualizzare la quantità rimanente ancora da consegnare.
- 18)Procedura per la modifica del file layoutmod.htm (Inizio)
(Moduli necessari: EFYLAYOUT)
1) Conservare una copia del file layout.htm e poi fare una copia rinominando il file in: layoutmod.htm.
2) Modificare il file layoutmod.htm utilizzando un editor html.
3) Attenzione:- non cancellare i campi us-Name1, us-Adre, us-post, us-City che devono figurare chiaramente in testa al nuovo documento.
- Non cancellare i comandi meta-tag dei commenti che servono come Código al software.
4) Testare la nuova impaginazione stampando diversi documenti. ATTENZIONE, fino a quando non disporrete della licenza ufficiale EFYLAYOUT, gli importi verranno sostituiti dalla parola "TEST", i totali da 0 ed il programma visualizzerà un mesaggio tipo "Licenza EFYLAYOUT per c:\...\layoutmod.htm non valida"
5) Se siete soddisfatti della nuova impaginazione, inviateci il file layoutmod.htm in allegato per approvazione
6) Al ricevimento dell'approvazione da parte nostra, potrete effettuare l'ordine del modulo EFYLAYOUT.
7) Al ricevimento del pagamento da parte vostra vi invieremo in allegato via mail la licenza ufficiale per l'utilizzo del modulo.
- 19)Configurazione ed utilizzo del lettore codici a barre (Inizio)
(Moduli necessari: EFYBARCODE)
1) Impostazione in EasyForYou.
Nel menù Strumenti->Parametri->Generali->ID Barcode-> impostare 120
2) Impostazione del Lettore codici a barre (interfaccia tastiera).
- Lingua per interfacciamento tastiera (gruppo 3)
Impostare i parametri del paese per la vostra tastiera - Terminator: (gruppo 4)
Nessun carattere (INVIO) dopo la lettura ma SPACE. - General Parameters (gruppo 16)
Selezionare: Upper Case
- Code ID Setting (gruppo 17)
Selezionare i tipi di codici a barre (i più comuni: CODE39, EAN13/UPC-A) - Function Key Emulation (gruppo 20)
Programmare l'inizio della lettura (vedere gruppo 6 - Preambolo) del codice a barre per il tasto funzione F9 or HEX 09
3) Lettura codici a barre da Easy For You.
Nella gestione dei documenti selezionare il cliente o fornitore e successivamente il tipo di documento, poi premere sul pulsante + o F2 per aggiungere un nuovo documento. A questo punto sarà possibile la lettura dei prodotti dalla tabella in basso alla finestra.
Se il Código del codice a barre del prodotto scansito non esiste ancora nella scheda prodotti, Easy For You proporrà di crearne uno nuovo.
Softwares
LSN4 USB Setup
(Read instructions here User Manual LSN4).
CPT8000 or CPT8001 CYPHERLAB (LSCPT8001) USB Setup
(Download instructions here https://www.easy-for-you.com/download/cpt8000.zip).
(Download TOOLS here https://www.easy-for-you.com/download/cpt8001/tools.zip).
BCST-20 and 10 (LSIDABAR115) USB Setup
First time, do NOT connect with the cable (use only to charge the scanner) !
Plug only the USB Dongle Bluetooth and allow the driver to install.
(Download and print the Barcode scanner Overview instructions here https://www.easy-for-you.com/download/BCST-20/BCST-20.pdf).
The only thing you need to do is to select the type of keyboard :
#8 Keyboard Language Setting
Read "Start Setting Barcode" - "Select your keyboard language" - "Save and quit"
(If not done, change your PC language as selected)
To do only if you want to group the quantities in the same line of a same product when scanning
(Download and print the INSTRUCTION MANUAL setup instructions here https://www.easy-for-you.com/download/BCST-20/BCST-20-advanced.pdf).
1) Page 46, scan "Enter setup" and Scan "Do not apply Enter for suffix" and scan "Exit with Save"
2) Page 48, scan "Enter setup" and Scan "Suffix Setting" and scan "3" and scan "2" and page 49 scan "Exit with Save"
(To Activate, check the variable in EasyForYou, menu tools->Parameters->Miscellaneous 2->ALL->Boolean->GroupQuanWhenScan)
UNITECH HT580 (LSHT580) USB Setup
(Download full instructions here https://www.easy-for-you.com/download/HT580/HT580-readme.pdf).
1- Create a folder c:\temp\DriverHT580
2- Download the driver from the site and unzip to a tempory folder c:\temp\DriverHT580 (DO NOT INSTALL THE DRIVER)
3- Connect the scanner before and when windows detect the new hardware, give the driver location map c:\temp\DriverHT580 to found the driver
Or download the PDF with the full procedure to install the drivers :
(IT) https://www.easy-for-you.com/download/HT580/FirstUse_IT.pdf
DRIVERS:
Unitec HT580 Website
or
Windows VISTA+W7 or 8 Driver
Windows XP Driver
Download Tools.zip Utility.
Open the Tools.zip, navigate to the folder Tools.zip\Tools\12Comm\*.* and copy all the 3 files to c:\....\Easy For You\import
Delete the two files WorkingINI.txt AND README Vxxxx.TXT
Start 12com.exe and wait a few seconds and STOP 12com.exe
The 12com.exe have created a new file 12Comm.ini
Edit the file 12Comm.ini with the Windows notepad and set :
COMPort settings = X,38400,8,1,0 (X= the com port from the UNITECH scanner available in Windows->System->Hardware->Peripherals->Ports COM...)
File(s) on PC = HT580.TXT
Save the file 12com.ini
Start again 12com.exe and scan a few barcodes, on the scanner, select tranfer to the computer, start EasyForYou and Press Shift-F2 keys
With Windows XP or if 12comm.exe give you a error message, go to Microsoft web site https://www.microsoft.com/downloads search and install .NET Framework
Other scanners :
BTS 4500 & BT-650 (LSIDABAR115) Default Setup for BTS software ( to UNZIP and copy in c:\....\easy for you and to load in BT scanner software, start the scanner software and load this file and push the button Upload file)
OPTICON (obsolete) (LSIAOPT-OPN) USB Setup (to run before connecting the scanner)
OPTICON Utility ( to copy in c:\....\easy for you\import )
EN: How to obtain a EAN13 code for your business -> https://www.gs1belu.org
FR: Obtenir un préfixe d'entreprise GS1
NL: Vraag een GS1 bedrijfsprefix aan
- Lingua per interfacciamento tastiera (gruppo 3)
- 20)Accorgimenti importanti di cui tener conto per aggiornare correttamente il programma in esecuzione (su una rete) (Inizio)
(Moduli necessari: EFYUPDATE)
Prima di procedere con laggiornamento del programma, si prega di chiudere tutte le altre sessioni in corso dell'applicazione Easy For You nel Task Manager di Windows.
Assicurarsi al 100% di quanto segue:
- Verificare nel Task Manager che easywin.exe non si aperto in nessuna delle postazioni (digitare CTRL-ALTCANC->Task Manager->Applicazioni).
- Fare un test (sul server se si lavora in rete) rinominando easywin.exe ed easywin.mdb in easywin2.exe ed easywin2.mdb.
- Se Windows autorizza la modifica di ENTRAMBI i nomi dei DUE file, allora sarete certi che nessun utente sta lavorando su Easy For You.
- Nelle proprietà della cartella condivisa in rete, TOGLIERE momentaneamente (giusto il tempo dell'aggiornamento) la condivisione proprio per evitare che un utente possa avviare Easy For You durante la fase di aggiornamento, il che potrebbe compromettere il processo per un corretto aggiornamento.
- (Sul server se si lavora in rete) rinominare easywin2.exe ed easywin2.mdb col rispettivo nome originale easywin.exe ed easywin.mdb.
- NON riavviare Easy For You ed effettuare l'aggiornamento dal sito alla pagina SCARICA (pulsante UPDATE in fondo alla pagina)
- Attendere il riavvio di Easy For You.
- Nelle proprietà della cartella condivisa in rete ripristinare la condivisione della cartella.
Scarica lultimo aggiornamento
https://www.easyforyou.be/updatefromeasy.htm
* 5 steps for NAS server mapped drive update OR in case the update is not successful on your computer with the other procedures :
1) Check if Make sure you have the latest update:
(see in the title bar of your EasyForYou software): Vers. YY.MM.xxx
Or in case YY and MM are the current year and month, you probably don't need to do an update (unless there is a bug)
Otherwise, proceed with the update as follows:
2) Launch EasyForYou and create a backup from the Utilities menu.
3) Check where the EasyForYou program is located, In EasyForYou, click the Help menu->Folders->EasyForYou
*** !!! Remember the name of this folder !!! for next step
4) Stop EasyForYou on all computers! And shut down all computers where you use EasyForYou.
Restart only ONE computer where EasyForYou is installed.
Warning!!! DO NOT restart Easyforyou on this computer after the computer has restarted!
5) Download the update from this link :
https://baron.be/download/allexe.zip
unzip the file and copy all extracted files to the EasyForYou folder ***.
Replace existing files.
If you have a multi-user system, you should only update one of the workstations.
Restart Easyforyou and check if the version number is correct.
(In case of multi-user network version, If you restart EasyForYou, on all other computers, the version number must have been adapted)
* If you have problems after printing PDF to reset your original
windows default printer as default printer :
Open your registry with regedit
Go to this registry key
HKEY_CURRENT_USER\Software\VB and VBA Program Settings\EFY\Settings
Add a new string value :
DefaultPrinter
And copy paste the name of your default printer as value
* If you have problems to print some list or list previeuw :
Try to run the software easywin.exe as Administrator (right-click)
If work not then :
Make a backup !!!
In the c:\....\EasyNet\Easy For You\all.ini , edit with notepad and set the line Transactions=N (or add this line if not present)
DONT FORGET THIS STEP ! : Rename the folder c:\....\EasyNet\Easy For You AS c:\....\EasyNet\Easy For You-OK
Stop and restart your computer, but before you stop disable your antivirus for a few minuts.
Download and reinstall the demoversion from us website.
(this will reinstall all the needed windows components for Easyforyou)
Rename the folder c:\....\EasyNet\Easy For You as c:\....\EasyNet\Easy For You-DEMO
Rename the folder c:\....\EasyNet\Easy For You-OK as c:\....\EasyNet\Easy For You
To Make a test of your list start c:\....\EasyNet\Easy For You\easywin.exe
If this work not try to change the compatibility for c:\....\EasyNet\Easy For You\easywin.exe
If this work not try to change users and set to admin for c:\....\EasyNet\Easy For You\easywin.exe
- 21)Procedura di disinstallazione completa di Easy For You (Inizio)
- Disisnstallare EasyForYou seguendo la consueta procedura:
Windows->Pulsante di Avvio->Impostazioni->Pannello di controllo->Aggiungi/Rimuovi programmi->Easy For You->Rimuovi.
- Disisnstallare EasyForYou seguendo la consueta procedura:
- 22)Setup E-Commerce
(Inizio)
(Moduli necessari: EFYESHOP)
Setup E-Commerce
- 23)Generatore di lettere di sollecito (Inizio)
(Moduli necessari: EFYREMINDER)
Impostazione parametri
Vedere menù Strumenti ->Parametri->Contabilità
La gestione avanzata potrebbe essere attivata spuntando Attivare la gestione avanzata dei solleciti
Sono disponibili tre livelli di sollecito.
Servono a generare automaticamente delle lettere di sollecito attraverso il menù:
Strumenti->Generatore di solleciti
Oppure passando per il menù
File->Strumenti->Attivare il generatore automatico di solleciti.
L'attivazione genera, all'avvio del programma ed una sola volta al giorno, la stampa delle lettere di sollecito e la copia della fattura da spedire per le fatture insolute.
Il sollecito di livello 1 viene generato automaticamente nelle seguenti condizioni (in base alla lingua del cliente), quando:
1) La fattura non è stata pagata (il tipo di pagamento è ancora con lo stato "Da pagare")
2) Nel menù File->Clienti, la categoria di sollecito di fattura NON è impostata su "Non sollecitare"
3) La data di scadenza della fattura + il numero di giorni indicato nel campo "Soglia di livello 1" (15 giorni come impostazione predefinita) è superata
Il sollecito di secondo livello viene generato automaticamente nelle condizioni seguenti, quando:
1) Come al livello 1
2) Come al livello 1
3) La data del primo sollecito, in basso al menù File->Documento + il numero di giorni indicato nel campo "Soglia di livello 2" (15 giorni come impostazione predefinita) è superata.
Il sollecito di livello 3 (ritardo di pagamento) viene generato secondo lo stesso principio del sollecito di livello 2 ma tenendo conto della soglia di livello 3.
Modifica dei modelli di lettere.
Nella griglia dei pulsantini di modifica delle lettere di sollecito (3 livelli per 6 lingue), è possibile modificare i modelli HTML cliccando sul pulsante di modifica corrispondente.
Si prega di verificare innanzitutto che: Un editor di testo HTML sia impostato come predefinito nel vostro Internet Explorer nel menù Strumenti->Opzioni Internet->Programmi (Come predefinito dovreste trovare Front-Page)
I file HTML layoutRxLL.htm (dove x = livello di sollecito, LL = lingua del sollecito) sono presenti nella cartella EasyForYou, e nel caso non vi fossero, sono allora scaricabili da
https://www.easy-for-you.com/download/layoutRxLL.ZIP
Spuntando le caselle "A partire dalla soglia di livello", potrete impostare delle sanzioni (con ammontare fisso o con un tasso d'interesse) che verranno calcolate a partire dalla data di scadenza e aggiunte ai solleciti (Vedere menù Strumenti->Parametri->Contabilità).
La categoria di sollecito predefinita verrà ripresa automaticamente durante la registrazione di un nuovo cliente in EasyForYou.
Funzionalità diverse legate all'utilizzo dei solleciti:
Dal menù File->Documenti (disponibile solo nella linguetta delle fatture): Cliccare il pulsante "Impagati", di seguito cliccare col tasto destro del mouse per filtrare e visualizzare unicamente le fatture che abbiano già un sollecito di livello X o visualizzare unicamente i solleciti generati tale giorno.
Cliccando sul pulsante destro del mouse sul numero di fattura apparirà il menù di testo, selezionare "Sollecito di fattura" ed il livello desiderato per passare la fattura a sollecito.
Cliccare a destra sul pulsante della stampante per stampare la lettera di sollecito. (lo stesso vale per i pulsanti di anteprima e l'invio via mail)
- 24)Password per accedere alla banca dati (easywin.mdb) (Inizio)
(Moduli necessari: EFYMDBACCESS,EFYHELPDESK)
ATTENZIONE: Non aprire mai direttamente la banca dati Easywin.mdb con il programma MSACCESS
Registrate la vostra licenza EFYMDBACCESS e verificate lan presenza del file Accesstomdb.txt
Se non disponete di una versione in rete di EasyForYou (EFYNET...), la banca dat verrà aperta in modalità Esclusiva, vogliate di conseguenza chiudere EasyForYou per effettuare le operazioni seguenti.
Nella cartella contenente la banca dati easywin.mdb, (normalmente in c:\Users\USERNAME\AppData\Roaming\EasyNet\Easy For You (Per individuare la cartella, vedi menu Aiuto->Cartella)), create una nuova banca dati Access che chiamerete EasyWin_il_nome_della_vostra_società.MDB.
Nella nuova banca dati, cliccare su "Nuovo" e scegliere "Aggiungere tabella", di seguito selezionare c:\Users\USERNAME\AppData\Roaming\EasyNet\Easy For You (Per individuare la cartella, vedi menu Aiuto->Cartella)\easywin.mdb ed infine cliccare su "Aggiungi".
Inserite la vostra password che si trova in Accesstomdb.txt.
Scegliete e selezionate le tabelle, e la vostra banca dati è ora pronta.
In questo modo, durante l'aggiornamento di EasyForYou la vostra banca dati personale non verrà modificata.
- 25)Istruzioni per l'invio del file easywin.mdb (Inizio)
1) Assicurarsi di disporre di un software di compressione (ad esempiohttps://www.winzip.com (la versione gratuita è già più che sufficiente)
2) In Windows, cliccare col pulsante DESTRO dl mouse sul "START" per visualizzare il menù di testo.
3) In questo menù, cliccare su "Espolra"
4) Nella parte a sinistra di Esplora, entrate in "Il mio computer"->Disco locale (C:)-> cliccare sula cartella c:\Users\USERNAME\AppData\Roaming\EasyNet\Easy For You (Per individuare la cartella, vedi menu Aiuto->Cartella) come riportato nell'esempio seguente.
5) Nella finestra di destra di Esplora, cliccare col piulsante DESTRO del mouse sul file easywin.mdb (*)
- (*) Nel caso non vedeste le estensioni in Esplora, cliccare sul menù Mostra>Dettagli.
- (*) Se ancora non vengono visualizzate le estensioni, in Esplora cliccare sul menù: Strumenti->Opzioni cartelle->Mostra->file e cartelle e deselezionare "Mascherare le estensioni conosciute", e poi cliccare sul pulsante "Applica"
6) Dopo aver cliccato col pusante destro del mouse sul file easywin.mdb, nel menù di testo, selezionare: "Comprimere ed inviare per email" o, a seconda della versione di Winzip: "Comprimi ed Invia".
- 26)Istruzioni per ricevere il file easywin.mdb
(Inizio)
1) Assicurarsi di disporre di un software di compressione (ad esempiohttps://www.winzip.com (la versione gratuita è già più che sufficiente)
2) In Windows, cliccare col pulsante DESTRO dl mouse sul "START" per visualizzare il menù di testo.
3) In questo menù, cliccare su "Espolra"
4) Nella parte a sinistra di Esplora, entrate in "Il mio computer"->Disco locale (C:) cliccare sula cartella c:\Users\USERNAME\AppData\Roaming\EasyNet\Easy For You (Per individuare la cartella, vedi menu Aiuto->Cartella) come riportato nell'esempio seguente.
5) Nella finestra di destra di Esplora, cliccare col piulsante DESTRO del mouse sul file easywin.mdb (*)
- (*) Nel caso non vedeste le estensioni in Esplora, cliccare sul menù Mostra>Dettagli.
- (*) Se ancora non vengono visualizzate le estensioni, in Esplora cliccare sul menù: Strumenti->Opzioni cartelle->Mostra->file e cartelle e deselezionare "Mascherare le estensioni conosciute", e poi cliccare sul pulsante "Applica"
6) Dopo aver cliccato col pusante destro del mouse sul file easywin.mdb, nel menù di testo, selezionare il menù "Rinomina" e rinominare il file con easywin-old.mdb (se easywin-old.mdb esiste già, cancellatelo prima)
7) Nel vostro progarmma di messaggeria fate doppio clic sul file allegato: easywin.zip.
8) Una volta aperto il file con Winzip,selezionate TUTTI i file contenuti nello ZIP.
9) In WinZip, cliccate sul pulsante "Estrai verso " (Estari verso) scegliere la destinazione abituale della vostra banca dati (normalmente c:\Users\USERNAME\AppData\Roaming\EasyNet\Easy For You (Per individuare la cartella, vedi menu Aiuto->Cartella)).
10) Decomprimere i file esistenti sostituendoli con quelli contenuti nella cartella ZIP.
- 27)Parametraggi possibili dai file con estensione INI (Inizio)
INI Files are simple text files and can be created with the notepad of Windows and be saved in the file where is installed your software (in general c:\Users\USERNAME\AppData\Roaming\EasyNet\Easy For You (Per individuare la cartella, vedi menu Aiuto->Cartella))
These files are intended to activate certain specific parameter settings.
The name of a file INI is consisted of the Code of the left 3 caracters of the document number (Type of document) for which it must act.
For example: for the invoices it will be FT1.INI
The contents of file INI must end in word END
Click here to download an example of INI file (or use ALL.INI if the parameter must be able for all the documents)
Available variables and their function:
NumberLineBody=0 (number of lines in the body of the document)
NumberLineFeed=0 (number of lines in the foot of the document)
NotPrintToPay=Y (does not print the mention `to pay' on the document)
Jo-Message-EN=Message (Long Message for the foot of the documents. These messages must be written in only one line but can contain HTML tags, for example to pass the text to the line. The comma must be replaced by
  and
and  for the Semicolon and
  for the apostrophe)
Discount-Message-EN=Message... in the event of use of discount - product ESC (same for NL. .EN. .IT. .DE...ES PT )
DontUpdateCreditWhenImport=Y (does not affect the balance of the customer in the event of importation of invoices by the system of importation of text files)
SequenceToOpenCashRegister=65 (Character for control sequence of opening of the cash register)
PrintPriceWeight=Y (Print the price by kilo on the documents)
OnlyCreateTableOnPrintLabels=Y (Creates a table LAB001 in easywin.mdb containing the data for the impression of bar-codes labels during the impression of a document)
PaymentRefNumber=999 (Code in the event of insertion link for payment by credit card)
CopyDocumentIn=copydoc (name of the folder (directory) in which you wish to preserve a copy of the original printed documents - HTML)
PrintPaidOnFeedDocument=FF0000 (impression in red of the text `Paid' on the paid invoices.)
LoginPaypal=info@yourloginPaypal.com (login paypal from Link for secure payment by credit card on the document)
PrintTL=Y (Print the number of lines on the foot of the document)
Shift-F7=T (Shift-F7 save the payement type 'T' and print the document)
SecondTaxField=DEPOSIT (replace the management of REPROBEL taxes by a management of the guarantees for the consigned products. Also possible for BEBAT, AUVIBEL)
WaitCoef=0.5 (Multiplying coefficient 2 - or divider 0.5 for the function wait function - ALL.ini)
NoQuestionForSerial=Y (No question if encoding of the number of serials # <> of the quantity - ALL.ini)
PrintCustomerEAN13Barcode=Y (Print the customer code with a EAN13 barcode on the documents)
PrintDocumentEAN13Barcode=Y (Print the Document number with a EAN13 barcode on the documents)
JouPopup=BC1 FT1 (or Y = ALL : name of the document type /POP:..type this code in the customer additionnal field and the Text that must be showed in a popup when you encode a new document
PutUserInRefPayment=Y (Adding automatically the vendor code in the payment reference when encoding the type of payment in a document)
ProductsMarginsfixed=Y (If Yes, in File->Products the recalculation of the 5 sales prices appends in the event of a change in costprice regarding the 5 Margins)
SecondTaxField=DEPOSIT or EXISES (replaces REPROBEL management fees by managing deposits for returnable or excise duties for the sale of alcohol products)
TakeUserLanguageToPrint=Y (When printing a document, the choice of language is based on the user's language)
ShortCut1=%IA (Example = ALT-IA-I. Alt-I for insert, ALT-A for Attachment - For the ALT use the character % (Create a shortcut to attach a document in your e-mails. Create the shortcut with the first letter of the pressed key ( if the ALT key is pressed, use the character percent (%). Consider uppercase and lowercase)
Available in:
- Sending a email with invoice in PDF format as attachment (FAQ 36)
- If you specify a destination type document in case of sending data as attachment in the menu File->Documents settings.
END
Additional variables for the *.ini files
Jx-Message-(Customer Language)-(My VARIABLE in additional fields Customer)=My specific text (Put your variable and specific text in FT1.ini for the invoices, in BC1.ini for the orders... example for : Jx-Message-EN-XXX=Blablabla put /BDP:XXX/ in the additional fields Customer
tx-Adre=Y (put the text "Adress" above the name of the customer/suplier when printing a document)
PathForExcelFiles=c:\tmp... (in All.ini select a specific folder for the export off excell files)
Note: If you like to change the c:\temp path, change into the registry from all the CLIENTs computers : HKEY_CURRENT_USER\Software\VB and VBA Program Settings\EFY\Settings\TempPath
ListDocReplaceTELE=ADR2 (in menu List->Documents replace the column "Phone" with another variable from the "CLI001" customer table)
ListDocReplaceMAIL=NOM2 (in menu List->Documents replace the column "E-Mail" with another variable from the "CLI001" customer table)
ReplaceLanguage=NLCN (for all.ini -> replace all the language NL 'dutch' with CN 'chinese' -> in case you put (translate yourself) the chinese text in colum NL from the Access file easytext.mdb)
GetDeliveryAdressIn=BC1*FT1...(for all.ini -> When printing a document, show the promt to select the adress or delivery adress if a delivery adress exist DO NOT use the semicolum as separator, only the *)
AddDeliveryAdressIn=BC1 or FT1...etc NEW(for all.ini -> When create a document, if a delivery adress exist then add automatically this delivery adress in the beginning of the body of your document)
PrintSerialReport=Y In this case, do not print serial numbers on the document (invoice, delivery notes), but print a separate report for all serial numbers regarding the document (invoice).
NoTransactions=Y (Stop the sql transactions process when updating database - no BeginTrans, CommitTrans, RollbackTrans possibility)
NobackupWhenRegroupDoc = Y (Regroup faster but not safe. Do it at your risk)
PrintIntrastat=Y (print intrastat codes from product form in the export documents (use this in BC1.ini, FTA.ini...)
SortByKey=CLE3 (print documents sorted by CODE 3 (use this in ALL.ini OR BC1.ini OR FTA.ini...) - you can also use variable CLE2 for "CODE 2" or Localisation for "Location"
SortBOBy=CLE3 (Sort Back-Order (BO1,BO2) documents on screen by CODE 3 (use this in ALL.ini) - you can also use variable CLE2 for "CODE 2" or Localisation for "Location"
DontPrintCode=Y Do not print the product code on the documents (use this in BC1.ini, FTA.ini...).
GroupQuanWhenScan=Y When you get a products with Barcode scanner in a document, group the quantities for the same products in the same line
DoNotUpdatePackages=Y When you change the purchase prices from a product do not recalculate the packages (increase the speed)
SpecialEscompte=8 When getting the product ESC (discount % if payd before 8 days), do not change the total documents on the food (put the text in the body of document instead of putting the text on the foot)
TextColPrice=Special text When printing a document, in the layout, you can replace the original text "Price" with your specific text - for example replace "Price" with "Unit prices" (use this in BC1.ini, FTA.ini...).
PrintTwoUnitPrices=Y When printing a document, replace the price with Price level1 + customer price (gross prices and net prices) the colum "Price" - (use this in BC1.ini, FTA.ini...).
CheckStop=Y Whit this parameter, the program easywin.exe check the stop.txt file in the network every 2 seconds and stop run all users if stop.txt is present
DocformatNR=2011-12/9999 Whit this parameter, you can format manually a specific document number (write the number (as example "2011-12") you want before the "/", and the 9999 will be replaced with the real document number)
OkLLSales=Y By default, Width and Length work only for purchases in the documents, with this option Width and Length work also for sales
PrintCashOnRegister=Y Print also the cash for each Users on the menu List Payments
DocformatNR=[mm] Add the month into the simplified document number ( 2012-01/1 )
GotoQuan=Y After a product selection in the document, focus go to the field Quantity
PrintPaymentDetails=Y After update the document, the details from all the paiments done are added as text in the body of the document
OkToMatchByAmount=Y (in All.ini for module: EFYCODA) If OkToMatchByAmount=Y and the payment reference does not correspond to any invoice, the software searches for an not paid invoice which corresponds to the amount of the coda. If ONLY ONE unpaid invoice is found and corresponds to this SINGLE amount, it will be cleared
ToleranceMatching=2 (in All.ini for module: EFYCODA) It is better to set ToleranceMatching=1 or 2 (corresponds to a small difference of 2 more or less eurocents). For example an invoice with amount of 1499.15 will not be cleared if the payment corresponds to 1499.1499 (this happens regularly in the coda files) or vice versa, for example an invoice with an amount of 1499.1499 (when printed the invoice is 1499.15 but for the research it will be 1499.1499 and will not be settled if the payment corresponds to 1499.15)
AdjustInvoiceAccordingToPeppol=Y (Automatic total rounding adjustment for Peppol exports)
To resolve discrepancies of a few cents that may occur on certain invoices during Peppol exports, we have introduced a new synchronization feature.
As EasyForYou cannot be natively aligned with the specific rounding calculation rules of the UBL 3.0 Peppol standard, this tool ensures full compliance. If a difference is detected, EasyForYou automatically adjusts the invoice total within the software to match the exact amount calculated on the Peppol document.
Important: This process requires sending the Peppol invoice BEFORE generating the PDF invoice.
This ensures that any necessary adjustments are applied to the EasyForYou record first, resulting in a corrected PDF invoice that perfectly matches the Peppol data.
Exporting text files containing the data to (re-)generate documents
- Export possible in menu Tools->Regroup Documents or with a RIGTH->Click on the print button, select Export)
- To re-import a generated document, copy the text ctp8****file.txt in the folder Easynet\Easy For You\import and press shift-f2
FolderForCrossFiles=C:\Users\Test\import With this parameter, you can specify a folder for exporting a document in text format (this, for example to send it by email or re-import it into another EasyForYou from another company)
CustomerForCrossFiles=MYCUSTOMER With this parameter, you can specify a specific customer (or supplier) when exporting a document in text format (this, for example to send it by email or re-import it into another EasyForYou from another company)
TypeDocForCrossFiles=INV With this parameter, you can specify a type of the new document generated when exporting a document in text format (this, for example to send it by email or re-import it into another EasyForYou from another company)
DocName-X-FR = Printed name of the document in French in case the vendor code is X
Used to change the name of a document according to the vendor code.
(for example to change "Purchase Order" to "Returned Products")
In the example BC1.INI (BC1 = Order, but it also works for all other documents BC1, FT1 etc ...)
DocName-X-FR = Printed name of the document in French in case the vendor code is X
DocName-X-EN = Printed name of the document in English in case the vendor code is X
Same logic for other languages ... (you can also put another name according to the letters)
DocName-Z-NL = Printed name of the document in Dutch in case the vendor code is Z
SetPaidButton=ON (or OFF) Set Payment button in menu selection from the lists and groupdoc.
SetNotPaidButton=ON (or OFF) Set Payment button in menu selection from the lists and groupdoc.
SetOpenButton=ON (or OFF) Set Payment button in menu selection from the lists and groupdoc.
SetClosedButton=ON (or OFF) Set Payment button in menu selection from the lists and groupdoc.
Parameters when sending documents by email
FileForAttachmentDoc (*filename.pdf for pdf file attachment with terms and conditions)
FileForTextSubjectMail (specific text for the subject)
FileForTextBodyMail (*filename.htm for specific text for the body)
NB: In case of multi-language, you can write FileForTextBodyMail(Language code 2 letters) or FileForTextSubjectMail(Language)
txtServer2=smpt.WithAnotherSMTP.com (Add this only in ALL.ini, If you have more than one SMTP connection - You can use txtServer2,txtServer3,4... until 10)
UrlSoc (Url to your logo file on your website to include in the mails:
for example
UrlSoc=https://www.baron.be/images/logosmall.gif )
ProductsGenerator=Y In Menu Files->Products (Key F8) Automatically generates a series of new products regarding the files Size.txt and Colors.txt
* filemane.pdf or filename.htm can be filenameXX.pdf (XX can be replaced with all of the 7 languages)
ALL.ini file only
Gettext Replace or translate a text in the program : AAA=old- (IT) NOT FOUND text- (IT) NOT FOUND BBB=your- (IT) NOT FOUND translation- (IT) NOT FOUND Add a line in the ALL.ini file with GettextAAA=BBB and save.
Specific for printing labels
specialLogoLabel=MyLabel.jpg (select a special picture to print on your label)
SecondLogoLabelsProductCode=X (if the name of the picture printed on label is MyLabel.jpg, the picture XMyLabel.jpg is selected and printed only if the product code begin with X)
GetSpecialLabelFileName=FTA (Load special label parameters in file easylabel-docFTA.ini when comming from menu List->Print Labels Barcodes)
specialQuantityLabel=4 (set a specific number of colums when printing labels on A4 paper format OR if you want only a specific quantity of label for each line from your document)
nTypeLayout=1 (select a specific type of paper size when printing labels use this in BC1.ini, FTA.ini...)
NbrCopyDoc=X (X is the default number of copies for a document in BC1.ini, FTA.ini...)
sortlabelby=MVT001.CLEA as ToSort (To sort the labels by a specific field)
LabelPrinter=ThePrinterForYourLabels (To print labels on a specific printer)
English note : Reorg.txt
If the file reorg.txt is present in c:\Users\USERNAME\AppData\Roaming\EasyNet\Easy For You (Per individuare la cartella, vedi menu Aiuto->Cartella) and contain one of the following words :
autorun = Start a automatically a full reorganisation from menu Tools->Reorganisation
autorunsetstocktopzero = Same as autorun and reset all product stock quantities to ZERO
deletealldoc = Same as autorun and delete definitely all documents (and movements) from your database and reset all products stock quantities to ZERO.
deleteallprod = Same as autorun and delete definitely all products from your database.
deleteallcust = Same as autorun and delete definitely all customers from your database.
deleteallcat = Same as autorun and delete definitely all categories from your database.
deleteallserial = Same as autorun and delete definitely all serial numbers from your database.
deletedeleted = Same as autorun and delete definitely all deleted records from your database
NOTE: In multi users sessions or if the main user have password, the Reorg.txt file must contain the Admin password at the second line !
Parameters to send with the easywin.exe "myparameter" (In order to use with the Windows Task scheduler)
AUTOCHECK or SHIFT-F2 Start Easyforyou and check with the shift-F2 command to import the orders or result from scanner
AUTOCHECKLISTPRODTOORDER Start Easyforyou and show the lines of the products to order
AUTOCHECKGROUPDOC Start Easyforyou and group the open Orders to invoices (to use with the SetPaidButton variable
AUTOPRINTINVENTORY Start Easyforyou and print the inventory (use with the Windows scheduler to print every year the inventory)
AUTOCHECKDOCTOSENDBYPDF Start Easyforyou and send all open invoices by PDF
AUTOCHECKEXPORTECOMMERCE Start Easyforyou and export a file for your e-commerce : easywin-ecommerce.mdb
AUTOCHECKFT1TOSENDPEPPOL Allows you to schedule the automated sending of your Peppol documents at your convenience (needs the module EFYPEPPOLAUTO)
- 28)Importazione-exportazione da Excel (Inizio)
Microsoft© Excel© example files are provided in your installation folder from your software "EasyForYou" (by default c:\Users\USERNAME\AppData\Roaming\EasyNet\Easy For You (Per individuare la cartella, vedi menu Aiuto->Cartella))
These files are:
customers-en.XLS for your customers and (or) your suppliers
products-en.XLS for your products.
categories-en.XLS for your categories.
To import your customers, suppliers or products:
1) Copy-Paste your data into the Excel files and save the Excel file in the same folder as easywin.exe and CLOSE the EXCEL software
2) Start you your software Easyforyou: click the Tools menu Tools->Import data from Excel.
- The non-existent products, customers or suppliers will be automatically added in your data base from EasyForYou.
- For each importation, if customers, suppliers or products already exist, the data (price, descriptions etc ) will be updated.
To export your customers, suppliers or products:
1) start EasyForYou in menu Tools->Import-Export data from Excel.
2) For the export to Excel files, click the button Export.
3) The generated file in the folder c:\Users\USERNAME\AppData\Roaming\EasyNet\Easy For You (Per individuare la cartella, vedi menu Aiuto->Cartella) is the same than for the import, only the name is changed to customers-en-export.xls and produts-en-export.xls for your products.
Note: A string can be used as a parameter to automatically start the import or export:
Parameter 1 = importexel
Parameter 2 = language (FR, NL, EN, ES, DE, IT, PT)
Parameter 3 = file type (C = Customers, P= Products, A = categories)
Parameter 4 = Import or export (IMPORT, EXPORT)
Format: 1 * 2 * 3 * 4 *
Example:
"C:\Program Files\Easy For You\ImportExcel.exe" importexel*EN*C*IMPORT*
- 29)Gestione delle Ecotasse (Inizio)
Attiva la gestione delle ecotasse o altro supplemento legate a certi prodotti. È possibile aggiungere diversi prodotti ECOTAX1, ECOTAX2, etc. (come per i prodotti normali, basta che il Rif. cominci per ECOTAX, RECUPEL REPROBEL, BEBAT, AUVIBEL, e sarà quindi selezionabile in ciascuna lista prodotti. N.B. Le tasse ECOTAX, RECUPEL REPROBEL, BEBAT, AUVIBEL possono essere calcolate o meno a seconda della percentuale del prezzo al quale la tassa è legata. (Vedere menù File>Prodotto)
- 30)Importazione da Documenti dell'altro software (Inizio)
(o -> Importazione-exportazione da Excel )
!!! Compatible Prestashop !!!
Import lines in a document (inventory movements) with a text file.
Necessary packages : EFYBARCODE ou EFYESHOP
Important : The customers (or supliers) codes present in the text files must exist in the customer file from Easyforyou. (same for the products) . In case of non exist, when importing the file, Easyforyou take the code REG and put the 'not found' code in square brackets before the product description.
Structure of the FileName : For example : YOURREFERENCE-BC1.txt (or .csv)
All the caracters (maximum 30 numbers or letters) before the - (minus caracter) are allowed and wil be taken as reference for the payment in the generated document (YOURREFERENCE like in the example from the next line) .
The 3 last caracters, define the type of document generated (BC1 for the example in the next line) in which the document will be generated.
So, for the example, Easyforyou will generate a customer with number -> BC12010000000X...
Structure from the file.
(semicolon delimited)
Click here to download the example YOURREFERENCE-BC1.txt
With the Notepad from Windows, create and save this text in your folder " import " if not exist, to create in folder c:\Users\USERNAME\AppData\Roaming\EasyNet\Easy For You (Per individuare la cartella, vedi menu Aiuto->Cartella)\import
Exemple from text file :
DATE;TIME;CLIENT;USER;PRODUCT;QUANTITY;PRICE;DESCRIPTION;DISCOUNT
13/04/2011;15:34:43;AAABCTEST;USERNAME;FLOP;50.00;23.97;Floppy disk;0.00
13/04/2011;15:34:43;AAABCTEST;USERNAME;BIC;30.00;1.28;Blue Stylo - BIC;0.00
13/04/2011;15:34:43;AAABCTEST;USERNAME;CD;20.00;1.11;Compact disc 80 minutes TDK;0.00
13/04/2011;15:34:43;AAABCTEST;USERNAME;TRA;1.00;14.50;Shipment;0.00
13/04/2011;15:34:44;AAABCTEST;USERNAME;;;;Your comments;
13/04/2011;15:34:43;NEWCUSTOMER;USERNAME;CD;50.00;23.97;Floppy disk;0.00
13/04/2011;15:34:43;NEWCUSTOMER;USERNAME;BIC;30.00;1.28;Blue Stylo - BIC;0.00
13/04/2011;15:34:46;NEWCUSTOMER;USERNAME;PAYMENT;500.00;K;3333-99999;
13/04/2011;15:34:45;GOOD-CAR-HAMBU;USERNAME;FLOP;60.00;23.97;Floppy disk;0.00
13/04/2011;15:34:45;GOOD-CAR-HAMBU;USERNAME;CD;15.00;1.11;Compact disc 80 minutes TDK;0.00
13/04/2011;15:34:45;GOOD-CAR-HAMBU;USERNAME;SH002;1.00;10.50;Shipment;0.00
13/04/2011;15:34:46;GOOD-CAR-HAMBU;USERNAME;;;;Your remark;
13/04/2011;15:34:46;GOOD-CAR-HAMBU;USERNAME;PAYMENT;0;A;444-88888;
1) DATE from the document
2) TIME from the document
3) CLIENT = Customer Code in Easyforyou
4) USER = User name (login Easyforyou)
5) PRODUCT = Product Code in Easyforyou
6) QUANTITY = Quantity (Decimal = DOT, numbers to format with 2 decimals, no zero)
7) PRICE = Unit proce (Decimal = DOT, numbers to format with 2 decimals, no zero)
8) DESCRIPTION = Description (50 caracters, no apostrophe and no quotation mark )
9) DISCOUNT = Discount (Decimal = DOT, numbers to format with 2 decimals)
The file can contain more than one customer, so you cn use one file to generate more than one document.
In the example, there is two different customers, the first AAABCTEST and for the 4 last lines the customer GOOD-CAR-HAMBU.
This will generate tree orders BC12010 .1,BC12010 .2 and BC12010 .3
You can also put remark's in the lines (see the example " Your remark ")
You can also put payments in the lines (see the example "PAYMENT")
A = Paypal
K = Credit card
B = Bank
Insert the customer data with a SQL request:
Create a customer code and use this code as filename (Example: TESTCUSTOMER)
Only the letters, numbers and the minus sign are accepted.
Max length = 15
Import in two stages :
1) Insert the record (INSERT request)
Example with a text file : Download the example (TESTCUSTOMER.sql)
2) Update data (UPDATE request)
Example with a text file : Download the example (TESTCUSTOMER.squ)To copy in your folder " import "
Importation : Start Easyforyou and press Shift-F2
After import, the file Extention is renamed in " .OK "
(For the example YOURREFERENCE-BC1.ok)
Specific From Version 10.12.793 (sorry only English for this informations):
- When you start easywin.exe, you can automatically execute the import shortcut "shift-f2".
For this, create a C:\.....\Easy for you\import\shift-f2.txt empty file.
(This file is automatically deleted each time the import is done)
- If you need the products information for a external e-commerce in TXT or CSV format. Call the ExportCSV.exe from the Windows sheduller to export automatically the Products.csv or products.txt
(Use the products.ini generated at the first start from ExportCSV.exe to specify the fields you want to export and the file extension you want - CSV or TXT)
- You can create customers.SQL or customers.SQU files if you want to import or update more than one customer in one single file.
- You can call the the easyforyouftp.exe as a shedulled task from a batch to upload your products informations or download automatically your order and new customers files from you external e-commerce.
- 31)Windows Vista (Inizio)
So that Windows functions work correctly:
To circumvent the many BUG of Copy-Paste of Windows, erase beforehand the temporary files of the Internet Explorer (In the Internet Options).
And especially, decontaminate the function UAC (User Account Control).
Warning: make a backup from all your files BEFORE decontaminating UAC
Open up Control Panel, and type in user account into the search box..
You'll see the link for "Turn User Account Control (UAC) on or off". Click it.
Uncheck the box "Use User Account (UAC) to help..." , and reboot your computer.
You should be done with obnoxious prompts!
Note: Disabling UAC will lead to a less secure system, so be warned.
- 32)Gestione delle attribuzioni delle rimanenze (saldi) fornitori (Inizio)
(Moduli necessari: EFYATTRIB)
EasyForYou gestisce le attribuzioni ai clienti dei prodotti in acquisto fornitore
Il modulo « Gestione delle attribuzioni » effettua automaticamente le operazioni seguenti :
- Al ricevimento della merce proveniente dai fornitori (file Acquisto->Rimanenze), al momento dellincodaggio della quantità, EasyForYou indica la lista dei clienti che hanno ordinato precisamente la merce ricevuta.
- È quindi possibile di attribuire facilmente le quantità ricevute rispettivamente ad ogni ordine cliente aperto
- Dopo convalida, EasyForYou genera automaticamente i bollettini di consegna o le fatture (a scelta), indi finalizza automaticamente gli ordini interamente consegnati.
- 33)Stampa etichette (Inizio)
(Moduli necessari: EFYBARCODE)
Consente, oltre alla stampa del documento, di stampare su una terza stampante, le etichette destinate destinate ai differente prodotti presenti su il documento.
To print labels relating to the documents :
1) Click the document tab for which you want to print labels
2) Click the Menu Files->Documents settingss, on the rigth click "Print labels"
3) If the labels must be printed on a specific printer, you can specify it in the menu : Tools->Parameters->Printing->Printer 3
4) If you do not want labels for specific products, in the menu File->Products->Categories, joint the product to a specific category and in the menu File->Categories->Select the product categories and uncheck "Print Labels"
- 34)Printing Error res://ieframe.dll/preview.js
(Inizio)
when printing after install IE8
1) Stop EFY
2) Be sure to be logged as Administrator
3) In Windows Start->Control Panel->Users->Turn UAC (user account control) OFF (disable UAC), restart your computer
4) In Windows Start->Program->Accessories->Command prompt (DOS) -> Right click and start as ADMINISTRATOR
5) In the DOS prompt enter the command: regsvr32 ole32.dll (press ENTER)
6) In the DOS prompt enter the command: regsvr32 ieframe.dll (press ENTER)
7) restart EFY and try to print
8) Other solution : Sometime the internet explorer work to slow (because of anti-virus or other...), the communication between easyforyou and the Internet explorer is to fast or to slow. In the root folder from EFY, near the easywin.exe, You create a text file mamed ALL.INI (see Parametraggi possibili dai file con estensione INI ) and include the variable WaitCoef=3, restart EFY and test the printing, if that work not try with WaitCoef=4 , and so one, each time restart easyforyou.
9) If this work not, (look here -> https://support.microsoft.com/kb/957700) or in Windows, go to Start->Control pannel -> Software- and uninstall IE8 Beta
10) If this work not try to click here
- 36)Generare PDF
(Inizio)
(Moduli necessari: EFYMAIL)
How to print and send PDF files by Email:
To use the send PDF button (right-Click on the Email button), you have first to setup this function in Windows 10, please follow this procedure:
1) Click menu Help->Folder->EasyForYou Ok
In the open folder ...\EasyForYou,search and right-Click AddPrinter.exe (Run as administrator)
QUIT the software EasyForYou !
2) Navigate to Windows Start menu.
Click :Settings
Click :Devices in the Settings dialog.
Make sure you are in the section :Printers & scanners
Disable the setting :Let Windows manage my default printer by setting it to Off.
Click on your main printer and select :Set as default.
3) Restart EasyForYou and in menu Tools->Parameters->General Check E-mail With SMTP and clicl the button Setup E-Mail SMTP
Input your SMTP server in the field
Copy your email adress also in Bcc Email, In this way, you will receive a copy yourself to put un your :Send Email folder
If you need to send :Terms of Sales. With your unvoices (appends only with invoices),
you can make a PDF document like TermsOfSales.pdf and copy this file to the folder ...\EasyForYou
Put TermsOfSales.pdf in the filed :Attachment
Click the Send Test Button to check if the SMTP works fine.
If the Send Test lasts too long, then you have to setup the SMTP options in the frame :Options
NOTE: If you have another Windows Version, follow the installation procedure of the PDF printer https://www.easyforyou.be/EN/printpdf.htm
Parameters when sending documents by email to put in the ini file (like FT1.INI for invoices)
FileForAttachmentDoc (*filename.pdf for pdf file attachment with terms and conditions)
FileForTextSubjectMail (specific text for the subject)
FileForTextBodyMail (*filename.htm for specific text for the body)
Example in FT1.IN to have aspecific subject and body
FileForTextSubjectMail=mailSubject.txt
FileForTextBodyMail=mailBody.txt
(in the file mailSubject.txt put your specifict text to send with the invoices)
(in the file mailBody.txt put your specifict text to send with the invoices)
You can work with multiple language
In the case create a file for each language like :
mailSubjectEN.txt
mailSubjectFR.txt
mailSubjectNL.txt
...
Fine-tuning settings for PDF printing.
(Some computers, being faster or slowed down by low-quality antivirus programs, may experience timing issues when printing PDF files.)
These variables, which can be added or have their values modified in the ALL.ini configuration file, allow for fine-tuning adjustments.
Example of these variables with their default values:
MinimumKiloBytesPDF=150 * Average weight in kilobytes of your printed PDF files. This value can be adjusted as it varies depending on the type and weight of your logo printed in the document.
WaitPDF=1 * Number of seconds required for the document to be visible to the Windows Explorer in the c:\temp folder.
MaxWaitPDF=5 * Number of seconds required for the document to be copied and visible to the Windows Explorer in the X:\YourDrive or NAS server\EasyNet\Easy For You\PDFdocuments folder.
* Please remove the explanatory comments in the all.ini file.
(Moduli necessari: EFYPDF)
You can easily automate daily or weekely the sending of PDF invoices to your all customers !
In the windows task planner, add a task with the command:
"C:\....\EasyNet\Easy For You\easywin.exe" "AUTOCHECKDOCTOSENDBYPDF"
You can also make so that emails sent in PDF are automatically accompanied by a few attached files.
Just put the files to be sent in the '.../Attachments/Tipo documento...' folder
For example:
In the .../Attachments/OP1/... folder
- Photos or PDF files that illustrate your company (be careful with the size of the photos, if the files are too large, it will not work or emails will not reach your customers)
- In the .../Attachments/FT1/... folder
Sales conditions for your invoices in PDF form
- In the .../Attachments/NEV/... folder
The delivery conditions for your Delivery Notes in PDF form
Warning ! In case you put files in these folders, they will be sent with ALL related documents.
- 37) Campo additionnàle: variables
(Inizio)
Campo additionnàle clienti/fornitori:
/POP: text/ -> displaying a popup with your text during encoding of new document specified in the parameter JouPopup from ALL.INI file
/GTB: text/ -> Get this text back when adding a new document (Exemple: chassis number of cars - garage).
/FAC: CUSTOMER-CODE/ -> When you work with the menu Tools->Regroup documents, the documents are regroupped in the customer CUSTOMER-CODE.
/APPROVER:CUSTOMER-CODE-from the approver/ -> When using the E-commerce, send a email copy of the order to the approver.
So if the order is approved, the approver can forward the email to the inventory manager to confirm the order.
Note: To add some specific fields regarding your business, when you add a new customer :
In all.ini, add this variable (or in menu Tools->Parameters->Miscellaneous 2->ALL->DefFieldsForAddFieldsCustomer) :
DefFieldsForAddFieldsCustomer=MyField1 : CRLF
CRLF MyField
2 :CRLFMyField
3 :CRLF
MyField
2 :CRLFMyField
3 :CRLF
You will retrieve the fields like this in the customer additional fields
/MyField1: PutHereYourValue1/
/MyField2: PutHereYourValue2/
/MyField3: PutHereYourValue3/
Note1: To load some specific fields from the Customer OR products ->Additional fields, when you load a package in a document from menu Edit->Load package:
Put the name of the variable in square brackets (example:MyField1)
in the description colum of the document.
When you load the package, the variable from the document descrition will be replaced with the value (PutHereYourValue1) from the customer or product additional fields or for any other fields from the Table products or customers from the database (To obtain the list of the available fields in your database, please get the module EFYMDBACCESS)
When you import customers-en.xls, you can also import data. fill the columns with your values after the last column like this :
Campo additionnàle Prodotti:
/NODISCOUNT/ -> When present in the product record, do not calculate the discount when using the Files->Documents Settings->Print the total discount on the document.
/PERCENT:Y/ -> When present in the product record, when you input hte this product in a document, the price is take as discount percentage.
/MESS(customer language):Your message/ -> Work only with (PERCENT:Y). When present in the product record, this message is printed on the bottom of the not paid invoices where the duedate is not the same as the invoice date (message example : )
All the other parameters are in C6 and C14 the setup e-commerce
/NODISCOUNT/ do no calculate the discount at the bottom of the document.
Campo additionnàle Categorie:
/PrintColor:#FF0000/ -> When present in the memo field (for example #FF0000 for RED color) from categorie, print the product description in this HTML color code.
- 38) Verificare la validità di una codice fiscale sul Web (Inizio)
(Moduli necessari: Gratuita)
To activate the online VAT chekking
On your computer, stop EasyForYou and in the folder c:\...\EasyForYou Edit the file ALL.INI and add a new variable with the url to your server like in this example :
CheckVATurl=https://ec.europa.eu
Save the file ALL.ini and restart EasyForYou
*we are not responsible for the use of this function and results. ! -> ec.europa.eu/taxation_customs/vies/disclaimer
- 39) Use EFY on multiple PCs via the Internet (for single-user version).
(Inizio)
(Moduli necessari: EFYNET2) -> download FREE DropBox 2Gb o FREE Google Drive 5Gb )
o FREE OneDrive 5Gb )
Example for an installation on a Workstation and Nootebook.
In this example, EasyForYou is already installed on the Workstation.
Carefully follow the order of these instructions.
Before you begin:
Make a backup copy in the Strumenti -> Effettuare un backup giornaliero all'avvio
Make a update Easyforyou (menu Strumenti -> Aggiorna versione)
To ease and speed synchronization, delete the help folder in c: \ .... \Easy For You \help
Then download and install Dropbox on the Workstation.
Create an account in DropBox, then share the folder c: \ .... \Easy For You to your Dropbox account
On the Nootebook
Download and install the demo version of EasyForYou
Start the demo and input te information for your company.
Create a dummy document with clients and product demo and print it.
Enter the activation code (CD-KEY)
Open the folder c: \ .... \ Easy For You (see the installation folder by right clicking on the icon EasyForYou -> Properties)
In this folder c: \ .... \ Easy For You DELETE the files easywin.mdb and easywin.exe
To ease and speed synchronization, delete the help file in c: \ .... \ Easy For You\help
Download and install Dropbox
Share the folder c: \ .... \ Easy For You to to your Dropbox account
After a few minutes, the files will be synchronized and you can work on your Workstation or Nootebook (but not both simultaneously ! To do this see the FAQ No. 40) On the other hand, the remote folder Dropbox (cloud) is an additional backup security.
- 40) Gestione degli arrotondamenti per gli importi di stampa, compresa l'IVA
(Inizio)
(Moduli necessari: EFYCURRENCIES)
Alcuni sono IVA inclusa, sono difficili da ottenere (premi magici) nei documenti.
Per esempio:
100,00 EUR IVA inclusa (21%) = 82,64 EUR, IVA esclusa
(ma 82,64 IVA esclusa + 21% IVA = 99,99 EUR IVA inclusa)
Per risolvere questo problema, fai clic sul menu File-> Valute e modifica:
Numero di decimali per i prezzi unitari: 4
Numero di decimali per totali: 4
(lasciare 2 decimali per la stampa)
Esempio con 4 decimali (visualizza 2 decimali quando si stampano i documenti):
100,00 EUR IVA inclusa (21%) = 82,6462 EUR, IVA esclusa
(Quindi 82,6462 IVA esclusa + 21% IVA = 100,00 EUR IVA inclusa)
- 41) Remote access via Internet
(Inizio)
(Moduli necessari: EFYNET2, 5...)
Several options for remote access via the Internet.
(single user or multi-user).
Single user
https://www.splashtop.com (remote control)
Small multy users
wikipedia.org (NAS - Network Attached Storage)
Recommended NAS for EasyForYou -> www.synology.com
Multy users
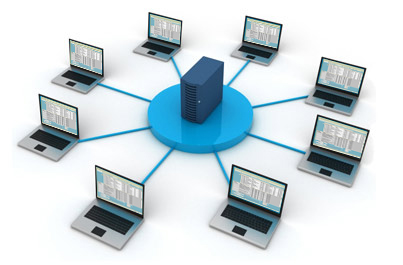
- https://express.ikoula.com
(Shared Virtual Server area for Windows application)
https://www.soft4europe.com (Terminal Server emulation)
https://www.clouditup.com (CloudItUp - Cloud Shared area Windows Server application)
https://www.jetclouding.com (Cloud Computing Software - Citrix alternative without Windows Server)
https://www.thinstuff.com -> XP/VS Server (Terminal Server Emulation to install on your computer)
https://www.microsoft.com Windows-server remote-desktop-services (Microsoft terminal server - Home Server)
https://www.citrix.com (Terminal Server)
https://www.windream.com (Citrix)
https://www.youtube.com/watch?v=fi87Xe78YNY Allow Multiple Remote Desktop Sessions - Windows 10 (at your own risk)
https://www.splashtop.com SplashTop is a remote desktop software that allows users to control and access a computer from another device.
Video on Youtube : https://www.youtube.com/@SplashtopInc
https://www.hoptodesk.com HopToDesk is a FREE remote desktop software that allows users to control and access a computer from another device.
Video on Youtube : https://www.youtube.com/watch?v=Df-pTywKGDM
- 42)Version Mobile Version(Inizio)
(Moduli necessari: EFYMOBILE)
Manuale dell'utente Version Mobile

- 43)Setup Smtp with your domain
(Inizio)
Parameters->General-Setup E-mail SMTP
Put your smtp adress something like (depends from your domain provider):
smtp.mydomain.com
OR
mydomain.com
SMTP Server : mydomain.com
SMTP Port : 587
Login : Checked !
Username : yourmail@mydomain.com
Password : Your password for your yourmail@mydomain.com account

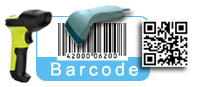
|
| FR NL EN ES IT DE PT |